Showing posts with label crochet. Show all posts
Thursday, February 14, 2013
Sunday, February 10, 2013
New in the Shop!
New made to order items for your consideration in my Etsy shop, Loops of Lavender!
Love knot scarf.
Can be made with ends loose or joined for an infinity love knot scarf, aw! Shown worn tripled here for cowl look.
Pom pom slippers.
Mary jane style slippers with a cute pom pom embellishment.
Yummy puff stitch scarf in new colors.
Wednesday, February 6, 2013
Project Linus: Knit & Crochet Blankets to Donate
My knit and crochet group has just chosen our latest charity project and I'm really excited about it.
For the months of February and March will be stitching blankets to donate to Project Linus.
Project Linus is a non-profit organization that provides homemade blankets to children in need.
Where I live in New Jersey, they have a Warren/Morris county chapter that would love to accept our donations!
We will be making 12” x 12” squares that I have volunteered to stitch together into finished blankets.
Please feel free to create full blankets or squares on your own, I’ll find a way to get all finished projects/squares together, just email me at loopsoflavender@gmail.com to coordinate if you have questions!
Here are some guidelines:
I’ve dedicated myself to making at least 2 squares a week, and I hope I can likely make more if I start crocheting on my lunch breaks!
Can’t wait until squares start rolling in! If you have plans to participate please comment and let everyone know! Please share and help spread the word! I think this is a great cause and a fun project for the group to give back locally.
If you're on Ravelry, you can follow the project's progress here!
For the months of February and March will be stitching blankets to donate to Project Linus.
Project Linus is a non-profit organization that provides homemade blankets to children in need.
Where I live in New Jersey, they have a Warren/Morris county chapter that would love to accept our donations!
We will be making 12” x 12” squares that I have volunteered to stitch together into finished blankets.
We would love for everyone to participate in this!
Even if you are not from the area, but want to help!
Please feel free to create full blankets or squares on your own, I’ll find a way to get all finished projects/squares together, just email me at loopsoflavender@gmail.com to coordinate if you have questions!
Here are some guidelines:
- Project will run from today to the end of March 2013, at which time blankets will be assembled and donated.
- Yarn should be clean, washable, and not be exposed to smoke or other strong smells/contaminates.
- No wool please.
- Size specifications:
Squares - 12” x 12”
Finished blankets - Project Linus donates blankets to children, infants through teens. Blankets could be as small as 36” × 36.” The majority of Project Linus blankets are about 40” × 60”, or what is called “crib size.” Blankets could be as large as twin size for teens. - Blankets can be knit or crocheted, use any pattern you like. Project Linus has a pattern resource page here.
I’ve dedicated myself to making at least 2 squares a week, and I hope I can likely make more if I start crocheting on my lunch breaks!
Can’t wait until squares start rolling in! If you have plans to participate please comment and let everyone know! Please share and help spread the word! I think this is a great cause and a fun project for the group to give back locally.
If you're on Ravelry, you can follow the project's progress here!
Any questions contact Kim at loopsoflavender@gmail.com.
Sunday, February 3, 2013
Crocheted Clothes Hangers
Stash bust plus repurpose crappy wire hangers from the dry cleaners by crocheting over them. They look cute and will keep your clothes from slipping to the floor.
Skill level
Beginner
Supplies
Wire hangers
Worsted weight yarn in your choice of colors
6.5 mm crochet hook
Hot glue gun
Skills
Single crochet
- Attach the yarn to the hanger to one side of the hook by reaching under the hanger and drawing up a loop. Yarn over with both the loose and working and end and draw through.
- Continue single crocheting around the hanger, putting your crochet hook under the hanger like it was the loops of your crochet work.
- Crochet up and around the hook, and fasten off.
- Use a bit of hot glue to secure the yarn from sliding off the end of the hook.
- Cut about eight inches of yarn, and tie a bow around the base of the hook.
Sunday, January 27, 2013
Valentine's Day Heart Garland
Here's a free pattern and tutorial for a little Valentine's Day seasonal decor to cozy up your home!

My garland was about 5 feet long and used about 27 mini hearts!
The pattern for the hearts is available for free from Crochet Today.
Download Mini Heart Pattern from Crochet Today
This little garland is happiest when all the hearts can rest against the wall or door frame, instead of swooping loosely. Otherwise they tend to face the floor a bit.

Here's a little tutorial on how to string them together.
My garland was about 5 feet long and used about 27 mini hearts!
The pattern for the hearts is available for free from Crochet Today.
Download Mini Heart Pattern from Crochet Today
This little garland is happiest when all the hearts can rest against the wall or door frame, instead of swooping loosely. Otherwise they tend to face the floor a bit.
Here's a little tutorial on how to string them together.
- Line up your hearts in the order you'd like them.
- Measure out your string to string the hearts on.
- You'll use knots to hold the hearts in place, so get your yarn needle threaded!
Tie a knot. String heart. Tie a second knot. Then repeat, allowing about an inch and a half or so of space between each heart. It looks like this.
It can be tricky to get the knot to land where you want it, but here's some tips.
Make a loop about where you want your knot to go, and pass your yarn needle through the loop.
Hold the loop down with your fingers as you pull the needle through.
It takes a little pushing and pulling but your knot shouldn't land too far off from where you want it.
To string your heart, thread your needle from the back to the front, then out the back again.
Continue knotting and stringing until all your hearts are used!
Saturday, January 26, 2013
Valentine Owl Cozy
My iPhone needed a cute case. So I made an owl in Valentine's day colors, why not? Hope you enjoy crocheting your own owl!

Owl Cozy
Skill level
Beginner
Finished size
iPhone size - About 4 1/2 x 2 1/4
Supplies
Worsted weight yarn in your choice of colors
5 mm crochet hook
Yarn needle
Two buttons
Embroidery thread & needle for sewing eyes
Skills
Single crochet
Slip stitch
Half double crochet
Double crochet
Crochet in the round
single crochet two together
Button sewing
Instructions
Body
Ch 21
Sl st into first chain to form ring
Sc in each around
Continue to sc in each around in spirals until desired length is reached
Fasten off
Turn tube inside out.
Using tail, sew one end of the cozy shut and turn right side out so seam is on the inside.
Wings
Make 2
Ch 9
R1: Sc in 2nd ch from hook, 2 sc, 2 hdc, 3 sc
R2: Ch 1, turn, 2 sc, 4 dc, 2sc
Continuing around opposite side of chain, sc in each across bottom and around far side.
Sl st in first sc of R2 and fasten off.
Eyes
Make 2
Ch 2
Rnd 1: Dc 8 in 2nd ch from hook
Fasten off
Beak
Ch 5
R1: Sc2tog twice
R2: Ch 1, turn, sc2tog
Fasten off
Finishing
Sew buttons on to eye rounds.
Sew on beak, then eyes, then wings.
Weave in all ends.
Owl Cozy
Skill level
Beginner
Finished size
iPhone size - About 4 1/2 x 2 1/4
Supplies
Worsted weight yarn in your choice of colors
5 mm crochet hook
Yarn needle
Two buttons
Embroidery thread & needle for sewing eyes
Skills
Single crochet
Slip stitch
Half double crochet
Double crochet
Crochet in the round
single crochet two together
Button sewing
Instructions
Body
Ch 21
Sl st into first chain to form ring
Sc in each around
Continue to sc in each around in spirals until desired length is reached
Fasten off
Turn tube inside out.
Using tail, sew one end of the cozy shut and turn right side out so seam is on the inside.
Wings
Make 2
Ch 9
R1: Sc in 2nd ch from hook, 2 sc, 2 hdc, 3 sc
R2: Ch 1, turn, 2 sc, 4 dc, 2sc
Continuing around opposite side of chain, sc in each across bottom and around far side.
Sl st in first sc of R2 and fasten off.
Eyes
Make 2
Ch 2
Rnd 1: Dc 8 in 2nd ch from hook
Fasten off
Beak
Ch 5
R1: Sc2tog twice
R2: Ch 1, turn, sc2tog
Fasten off
Finishing
Sew buttons on to eye rounds.
Sew on beak, then eyes, then wings.
Weave in all ends.
Monday, December 31, 2012
Classy Jar Cozy
I needed to pretty up a windowsill in my kitchen, so I crocheted cozy covers for these mason jars, and added little "belt loops" to thread a pretty ribbon through. Enjoy the free pattern!
Skill level
Beginner pushing intermediate
Finished size
Up to you, made to fit your jar!
Supplies
Mason jar
Worsted weight yarn
5 mm crochet hook
Yarn needle
Skills
Ch - Chain
Sl st - Slip stitch
Sc - Single crochet
Dc - Double crochet
Hdc - Half double crochet
Sk - Skip
Instructions
FYI, you don't actually crochet this while it's around the jar. I just popped it on the jar for photos!
Ch in multiples of 6 to fit around your jar with a bit of a stretch to it.
Row 1: 4 dc into 3rd ch from hook (this is your first shell), sk 2, sc, sk 2, *5 dc in next st, sk 2, sc, sk 2, repeat from * around ending with sc. Sl st in base of first shell to form a circle.
Here is row 1 unjoined.
Row 2: Ch 1, continuing around opposite side of chain, sc into each around. (You should have 2 less stitches than your starting chain)
Row 3: Ch 1, sc in same, sc in next 2, *sc in front loop only of next (this means the loop that is on the inside of the circle), sc in net 3, repeat from * around ending with front loop sc in last, sl st to join.
Row 4: Ch, sc in same, sc in each around, sl st to join.
Row 5: Ch 1, sc in same, sc in next 2, *dc into exposed back loop of Row 3 sc, sk next sc (the sc above where you dc into the Row 3 back loop), sc in next 3, repeat from * around, sl st to join.
Here's how what you're doing in Row 5 will look. You're creating a little belt loop to thread a ribbon through later.
Row 6: Ch 1, sc in same, sk next, *5 hdc in next, sk next, sc, sk next, repeat from * ending with skiping last stitch, sl st to join.
Row 7: Sl st in next 2, *sc in next, ch 5, sk next 5, sc in next, repeat from * around, sl st in first sc at top of shell.
Row 8: Ch 1, sc in same, *sk 2 ch, 5 hdc in next ch st, sk 2 ch, sc in next, repeat from * around ending with 5 hdc, then sk 2 ch, sl st into first sc.
Repeat rows 7 - 8 until desired length is reached.
Last row: Ch 1, sc in same, *5 sc in ch space, sc in next, repeat from * around, sl st to join, fasten off.
Finishing
Weave in all ends.
Use crochet hook or yarn needle to help thread ribbion through loops, then tie in a bow.
Thursday, December 6, 2012
Bow Boot Cuffs
I have a girly boot cuff pattern for you. Christmas is coming, whip up a few sets of these in different colors in an afternoon!
Ch - Chain
Sl st - Slip stitch
Bow Boot Cuffs
Skill level
Beginner
Finished size
Width: Make to fit your calf! Mine pictured is 4 3/4 wide
Length: About 4 inches
Bow: 3 inches wide
Supplies
Worsted weight yarn (For mine, my one skien of Simply Soft will make many sets of boot cuffs)
5 mm crochet hook
Yarn needle
Skills
Sl st - Slip stitch
Sc - Single crochet
Dc - Double crochet
Sk - Skip
Instructions
Cuff
Make 2
Ch 36
Or enough to fit around your calf with a little bit of stretch, and sl st to join. Rows 1 - 7 are worked in continuous spirals. Use a stitch marker in the last stitch of each row to keep track of how many rows you work.
Row 1 - 7: Sc in each around until piece is approximately 1 1/2 inches tall, or more until piece reaches your desired height
Row 8: *2 dc in next sc, ch 1, sk 2, repeat from * around
Row 9: Ch 2, turn, dc in next ch space, *ch 1, sk 2 dc, 2 dc in next ch space, repeat from * around, sl st to join
Row 10 - 13: Repeat row 9 (or until desired height is reached)
Fasten off and weave in ends
Bow
Make 2
Ch 25, sl st to join
Row 1 - 5: Sc in each around
Fasten off and weave in ends
Bow Center
Make 2
Make 2
Ch 7
Row 1: Sc into 2nd ch from hook and in each across
Row 2: Ch 1, turn, sc in each across
Fasten off and leave tail long enough to sew on bow
Assembly
Wrap the bow center around the bow and sew it tightly to cinch the bow in the center. Sew bow on to back of cuff at center, and on both ends.
Saturday, November 24, 2012
Yummy Puff Stitch Scarf
Sometimes I just lack the focus to crochet anything complicated. I just want to be crocheting and not have to think about it. If you've ever felt the same way I have a great instant gratification project for you!
It's the yummy puff stitch scarf! For mine, I used two strands of Caron Simply Soft held together for super puffiness. Any bulky weight yarn would also do. This is an easy project that goes fast, and creates a super delicious chunky cowl.
Yummy Puff Stitch Scarf
Completed items from this pattern are intended for personal use only, please!
Skill level
Beginner
Finished size
About 33 inches long with ends joined. 8 inches wide.
Supplies
2 - 3 skeins of Caron Simple Soft
10 mm crochet hook
Yarn needle
Skills
Ch - Chain
Sl - Slip stitch
Puff - Puff stitch
Here's how you puff stitch. Make sure you keep your yarn very loose.
Ready to puff stitch with one loop on your hook, pull up to extend that loop so it's about as tall as a double crochet. Yarn over, insert hook in next stitch and draw up a loop (3 loops on hook). *Yarn over, insert hook into that same stitch and draw up a loop (5 loops on hook). Repeat from * 3 more times (5 times all together) and you should wind up with 11 loops on your hook.
Yarn over and draw through all 11 loops on hook, then chain one to close off the puff.
Instructions
Using two strands held together, loosely chain 133.
Row 1: Turn, puff into 4th ch from hook, *sk 2, puff into next ch, repeat from * across, ch 3.
Row 2: Turn, *puff into next ch space, repeat from * across, ch 3.
Row 3 - 10: Repeat row 2. Do not fasten off.
Finishing
Slip stitch ends together to form a circle. Fasten off and weave in ends.
Friday, August 3, 2012
Friday Fancy-ness
In my effort to post more and create a more inspiring blog, I bring you fun photos and links from what inspired me this week. Perhaps this will be a regular thing?
Penny Arcade Jacket from Vickie Howell
I want to crochet this now. Now. It's a great "my office is freezing" sweater.
Saturday, March 24, 2012
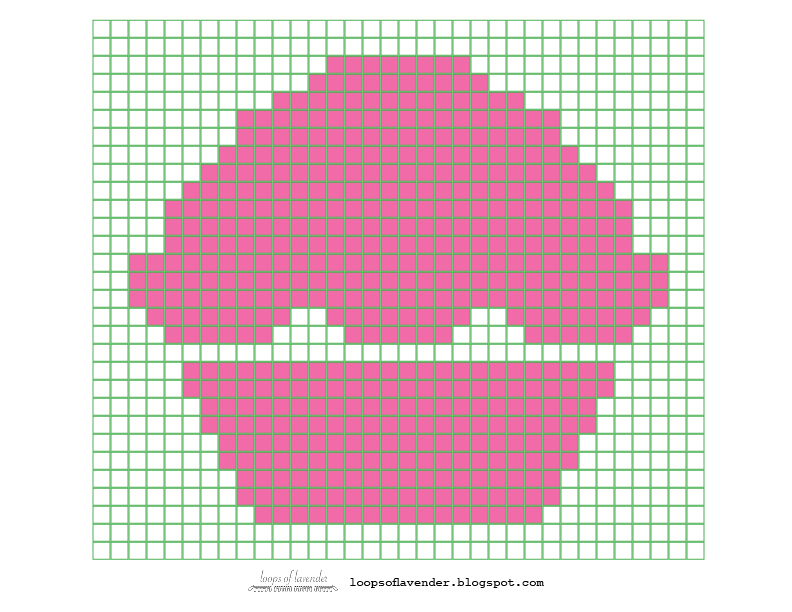
Crochet Cupcake Block
Today I'm sharing a chart to crochet a cute cupcake block. The finished size is about 9 1/2 x 8 inches. These make great quilt blocks or potholders, if you aren't that ambitious. :o)
Download the chart! Pattern after the jump.
Saturday, March 10, 2012
Chocolate Bunny Crochet Pattern
Today we're crocheting chocolate bunnies for Easter. Make mine chocolate!
Keep going for the FREE pattern!
Friday, March 2, 2012
Hatching Easter Chicks Crochet Pattern
Wednesday, February 22, 2012
Forever Homes and Crochet Pet Bed Pattern
I have an adopted bunny rabbit named Lillie. She came to live with me on February 19, 2009. She is an adorable, feisty, diva bunny, and I love her so.
A few weeks ago I crocheted Lillie a new bed out of upcycled bed sheets, great project if you have small animals (dogs and cats included). Plus, I have more information to share on adopting bunnies!

A few weeks ago I crocheted Lillie a new bed out of upcycled bed sheets, great project if you have small animals (dogs and cats included). Plus, I have more information to share on adopting bunnies!
Friday, February 10, 2012
Chocolate Chip Cookie Crochet Pattern
Here's a super easy, super cute crochet project. Crochet chocolate chip cookies! They make great play food for tea parties, and you can use the "magic circle" instructions in this post to make the chips.
Sunday, February 5, 2012
Sunday Secret to Crocheting in the Round Using the Magic Circle
I figure I better put something helpful on this blog once in awhile. So I'm starting a new regular series called Sunday Secrets where share helpful tips and tricks to doing...well...something!
This week I have some step by step pictures of how to start crocheting in the round starting with the magic circle. It's a different way to start crocheting in the round, that won't leave you with the hole at the center of your work you get when you crochet into a chain.

This week I have some step by step pictures of how to start crocheting in the round starting with the magic circle. It's a different way to start crocheting in the round, that won't leave you with the hole at the center of your work you get when you crochet into a chain.
Subscribe to:
Posts (Atom)